Lost in the Details? Define then design.
Introduction – It’s easy to get caught up in all the parts
It isn’t old age, but a sign of maturity when you have to write things down in order to remember them later. Ideas are like gas, potent when present but easily forgotten when gone. If ideas are worth keeping, then organizing and documenting will give them solid form. It seems simple, but failing to structure complex ideas only adds to the complexity. You can spare yourself lost details or circling back countless times. Creating a structure to an idea not only makes it easier to convey to others but also easier to digest. Ideas are meant to give fruit to more ideas, not rehash in endless loops.
Purpose – Asking the pertinent questions
In this post, I’ll cover a basic way to organize an idea that I’ve worked with in the past. I put myself in the “other person’s” shoes to formulate the questions. It’s easier to think of it in terms were the works is being handed off. What needs to be done? What are the requirements? What are the limits? What is the deadline?
Details – Remember that you’ll forget
Process definition and design starts with asking the right questions that have the clearest answer.
- What is it you’re trying to do?
- What are the parts? How do they work and connect?
- What will it look when it’s put together?
- Is there an easier way?
1. Define the process. What are the goals of the process?
In this example I want to geotag data from sensors for use in heat maps. Tilt sensor data will be used to plot smooth or rough road conditions in the area. Current sensor data will be used to plot high energy use in the area. The ultimate goal is to have enough information to make route selections that are the most comfortable and energy efficient.
2. Defined the hardware use for the process. What will be used?
A GPS unit from SparkFun GP-635T will be used as the Geotag source. This device streams TTL-UART (serial) data at 9600 from its transmit pin, while powered from a 3.3 to 5 volt source.
The current sensor used will be a Pololu ACS714 unit which has a variation of analog voltage based on the current passing through it. It is powered with a 5 volt source.
Tilt sensor data will be acquired using a Parallax MMA7455. This device operates from a 3.3 to 5 volt source. The tilt sensor uses SPI to send and receive data.
All of the sensor peripherals will connect to the Arduino UNO. This micro controller will detect serial data from the GPS and parse the values to registers. That event will trigger it to register the value it reads on its analog pin from the current sensor. Next it will establish SPI/I2C communications with the tilt sensor and register readings made successively for a short period of time. The variations in the tilt values will be processed later to give standard deviation, which is the amount of vibration the sensor is experiencing. All of the registers will print their values serially out.
The data will be logged using a SparkFun OpenLog. This device writes the serial data sent to it at 9600 baud to a microSD chip inserted into it. This device operates with 5 volts.
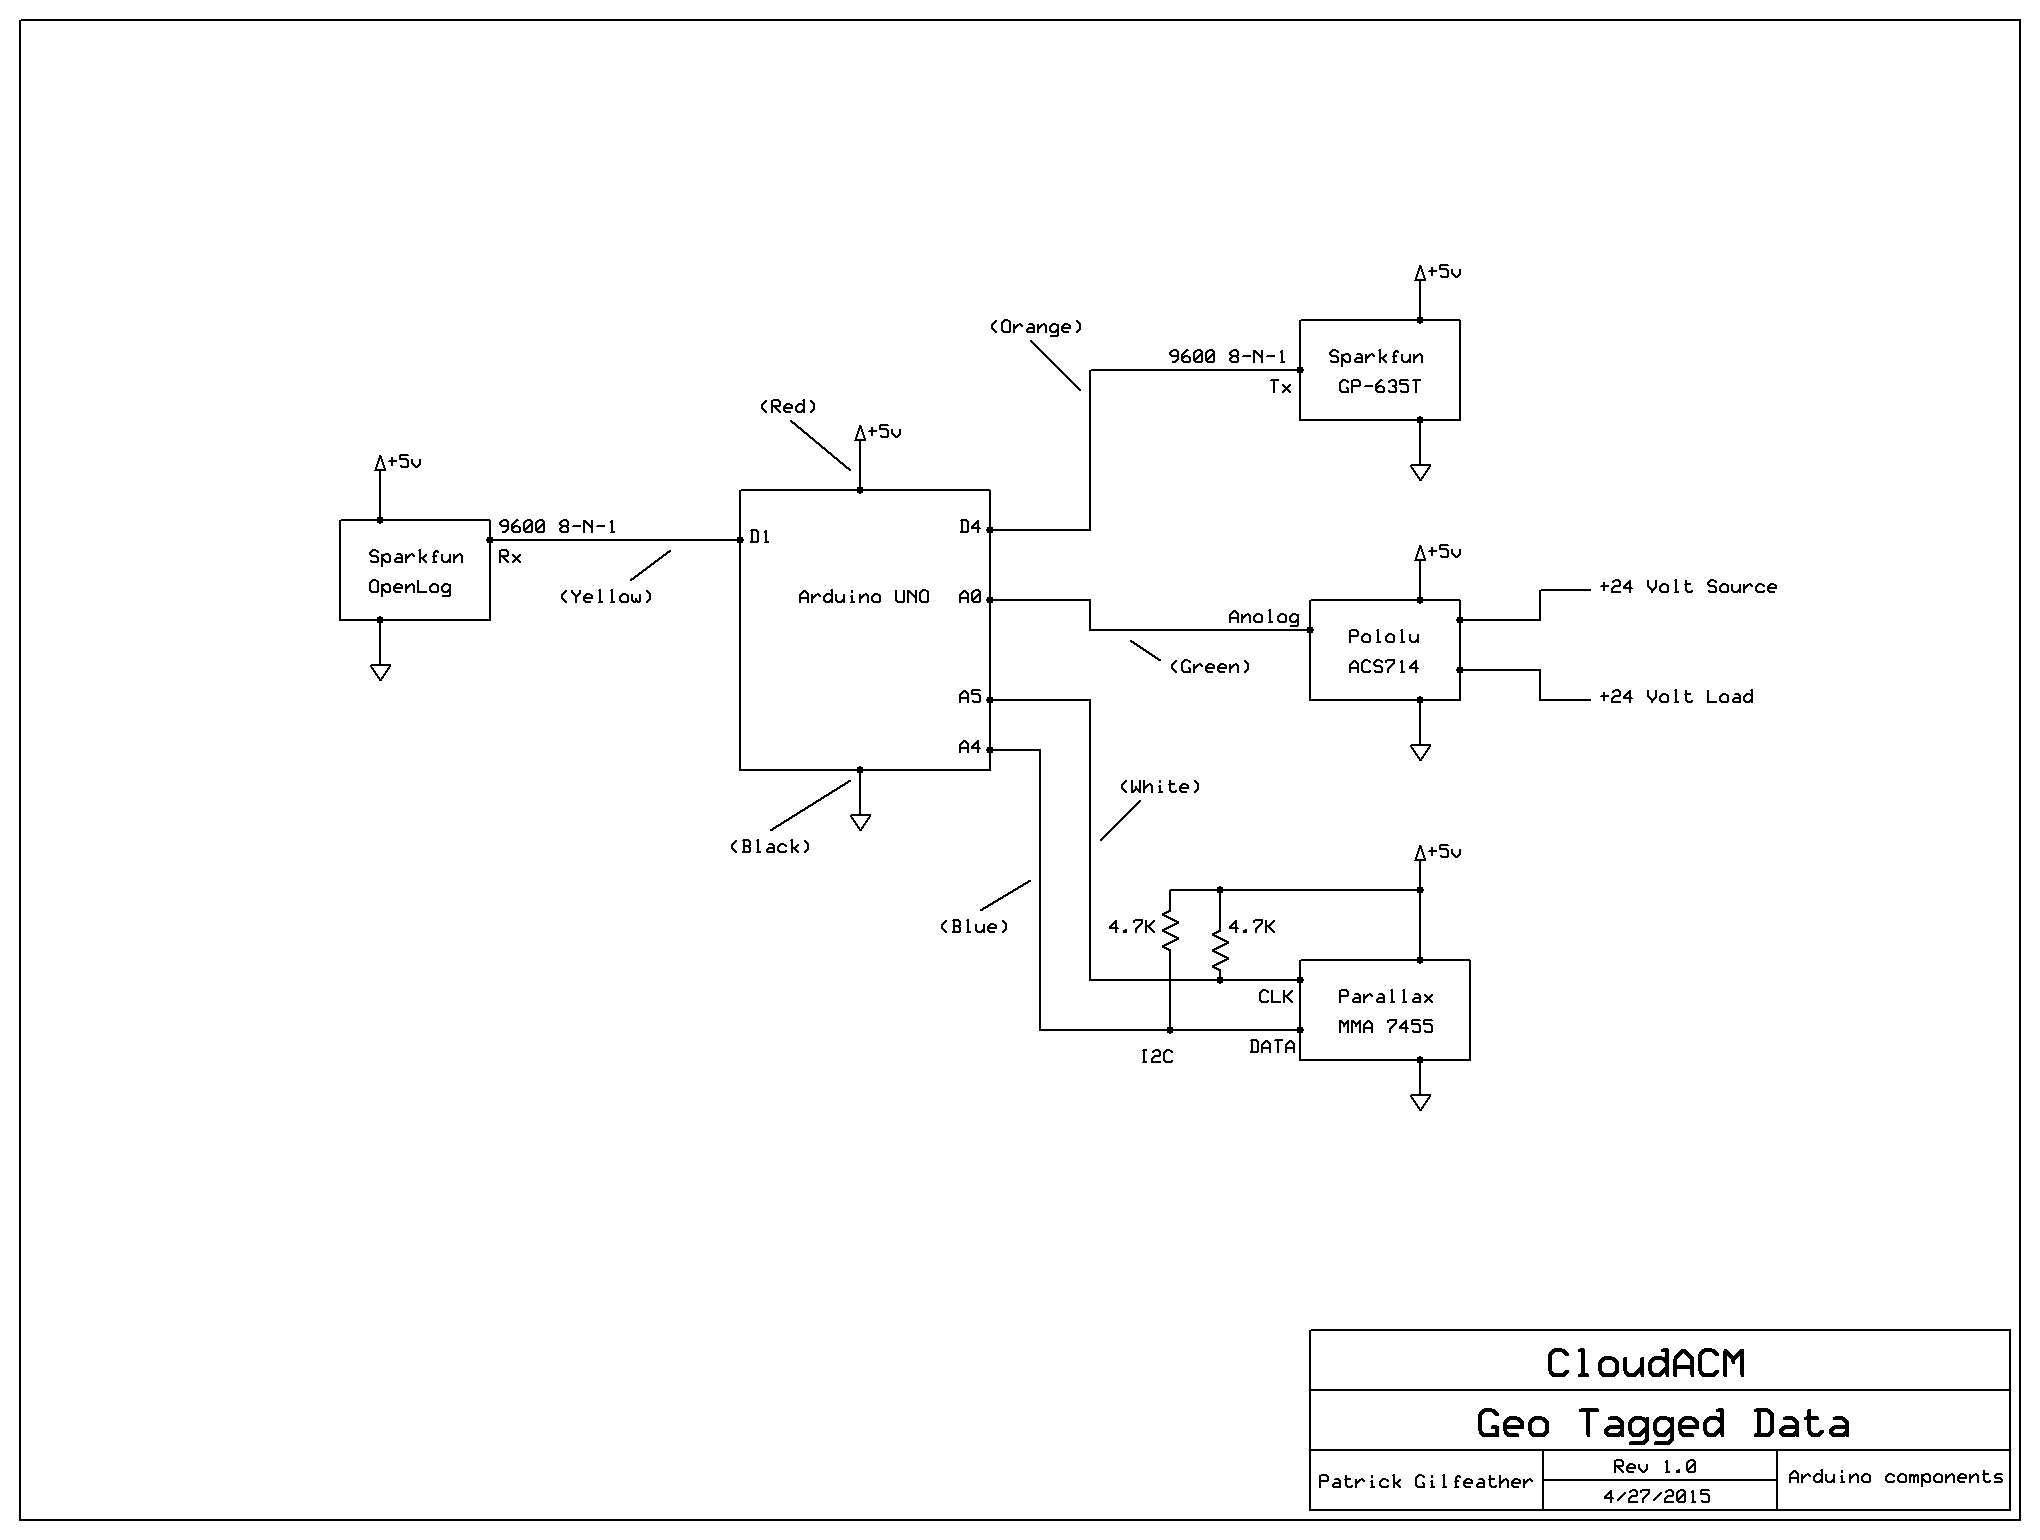
3. Based on the spec sheets for all of the components, its easier to create a connection diagram.
There isn’t any questions about this. Having a connection diagram gives a bird eye view of the parts. It lessens the chance of connecting something wrong and it clears the path. Even the basic summary of specs defined above is no match for the clarity of the diagram below. It drives the point home.
4. Where is the code for the Arduino? What code can be used for each part?
It’s much easier to start with something. Fortunately, we can use fundamental code that has already been written. Lets start by breaking down the code into segments based on each of the components.
- The OpenLog is easy, it receives serial TTL-UART data from the Arduino. No code needed, just connect it to the correct pin and set your serial out of the Arduino to the correct baud rate.
- The Pololu current sensor is analog data, here we can reference the “AnalogInOutSerial” from the Arduino IDE examples list, kindly offered by Tom Igoe.
- The Parallax tilt sensor can operate using SPI/I2C. Even though this isn’t included with the IDE examples, the code is already written and available, thanks be to Moritz Kemper.
- Data from the GPS is a little more complex, it has to be parsed and formatted. Also, the devices sends serial TTL-UART data to the Arduino. Great thing is the leg work has already been done, thanks to Mikal Hart.
I find it much easier to use the most complex piece of code as base code. Strip away code that won’t be used. From there, the simpler code can be added to the base, much like a pyramid.
Summary – Consider it an investment
In this post I covered a basic way of structuring an idea with the intent that it can be revisited later with minimum effort. It gives firm footing on the concept and provides inroads to more advanced ideas. The steps are worthwhile and rewarding, although they might not seem to be initially.