Sox Band-Pass and Band-Reject Filtering
SoX provides many filters to process audio data. In this post I’ll be covering how to apply pass or reject filtering of frequency bands, commonly referred to as band-pass or band-reject. This filter will take a frequency or a range of frequencies and either remove them from an audio file or remove all other frequencies while keeping only them.
I’ll cover 5 filters available in SoX that do this type of audio processing. Here is some information about each of these filters from the online help documents, http://sox.sourceforge.net/sox.html.
bandpass|bandreject [−c] frequency[k] width[h|k|o|q]
Apply a two-pole Butterworth band-pass or band-reject filter with central frequency frequency, and (3dB-point) band-width width. The −c option applies only to bandpass and selects a constant skirt gain (peak gain = Q) instead of the default: constant 0dB peak gain. The filters roll off at 6dB per octave (20dB per decade) and are described in detail in [1].
highpass|lowpass [−1|−2] frequency[k] [width[q|o|h|k]]
Apply a high-pass or low-pass filter with 3dB point frequency. The filter can be either single-pole (with −1), or double-pole (the default, or with −2). width applies only to double-pole filters; the default is Q = 0.707 and gives a Butterworth response. The filters roll off at 6dB per pole per octave (20dB per pole per decade). The double-pole filters are described in detail in [1].
sinc [−a att|−b beta] [−p phase|−M|−I|−L] [−t tbw|−n taps] [freqHP]
[−freqLP [−t tbw|−n taps]]
Apply a sinc kaiser-windowed low-pass, high-pass, band-pass, or band-reject filter to the signal. The freqHP and freqLP parameters give the frequencies of the 6dB points of a high-pass and low-pass filter that may be invoked individually, or together. If both are given, then freqHP less than freqLP creates a band-pass filter, freqHP greater than freqLP creates a band-reject filter. For example, the invocations
sinc 3k
sinc -4k
sinc 3k-4k
sinc 4k-3k
create a high-pass, low-pass, band-pass, and band-reject filter respectively.
The default stop-band attenuation of 120dB can be overridden with −a; alternatively, the kaiser-window ‘beta’ parameter can be given directly with −b.
The default transition band-width of 5% of the total band can be overridden with −t (and tbw in Hertz); alternatively, the number of filter taps can be given directly with −n.
If both freqHP and freqLP are given, then a −t or −n option given to the left of the frequencies applies to both frequencies; one of these options given to the right of the frequencies applies only to freqLP.
The −p, −M, −I, and −L options control the filter’s phase response; see the rate effect for details.
You can view the filter command structure using these help commands.
sox --help-effect bandpass
sox --help-effect bandreject
sox --help-effect highpass
sox --help-effect lowpass
sox --help-effect sinc
The SoX commands can nest multiple filters in the same command. So you can combine these different pass and reject filters into a single command. Now lets apply these filters to an audio clip to get a better understanding of how they actually work. First I’ll use a sample of white noise and apply filters to it to show how they work.
sox -n "/home/local/Desktop/WhiteNoise.wav" synth 10 whitenoise
sox "/home/local/Desktop/WhiteNoise.wav" "/home/local/Desktop/WhiteNoise-HighPass.wav" sinc 1k
sox "/home/local/Desktop/WhiteNoise.wav" "/home/local/Desktop/WhiteNoise-LowPass.wav" sinc -1k
sox "/home/local/Desktop/WhiteNoise.wav" "/home/local/Desktop/WhiteNoise-BandPass.wav" sinc 1k-3k
sox "/home/local/Desktop/WhiteNoise.wav" "/home/local/Desktop/WhiteNoise-BandReject.wav" sinc 3k-500
Lets spectrogram the source audio as well as the results.
sox "/home/local/Desktop/WhiteNoise.wav" -n spectrogram -m -o "/home/local/Desktop/WhiteNoise.png"
sox "/home/local/Desktop/WhiteNoise-HighPass.wav" -n spectrogram -m -o "/home/local/Desktop/WhiteNoise-HighPass.png"
sox "/home/local/Desktop/WhiteNoise-LowPass.wav" -n spectrogram -m -o "/home/local/Desktop/WhiteNoise-LowPass.png"
sox "/home/local/Desktop/WhiteNoise-BandPass.wav" -n spectrogram -m -o "/home/local/Desktop/WhiteNoise-BandPass.png"
sox "/home/local/Desktop/WhiteNoise-BandReject.wav" -n spectrogram -m -o "/home/local/Desktop/WhiteNoise-BandReject.png"

You can see from the results how the filtering changes the audio. Lets look at a practical application of this filter. I have a source video that has some artifacts on the audio track. It wasn’t apparent when I listened to it initially, but was easy to spot with a spectrogram.
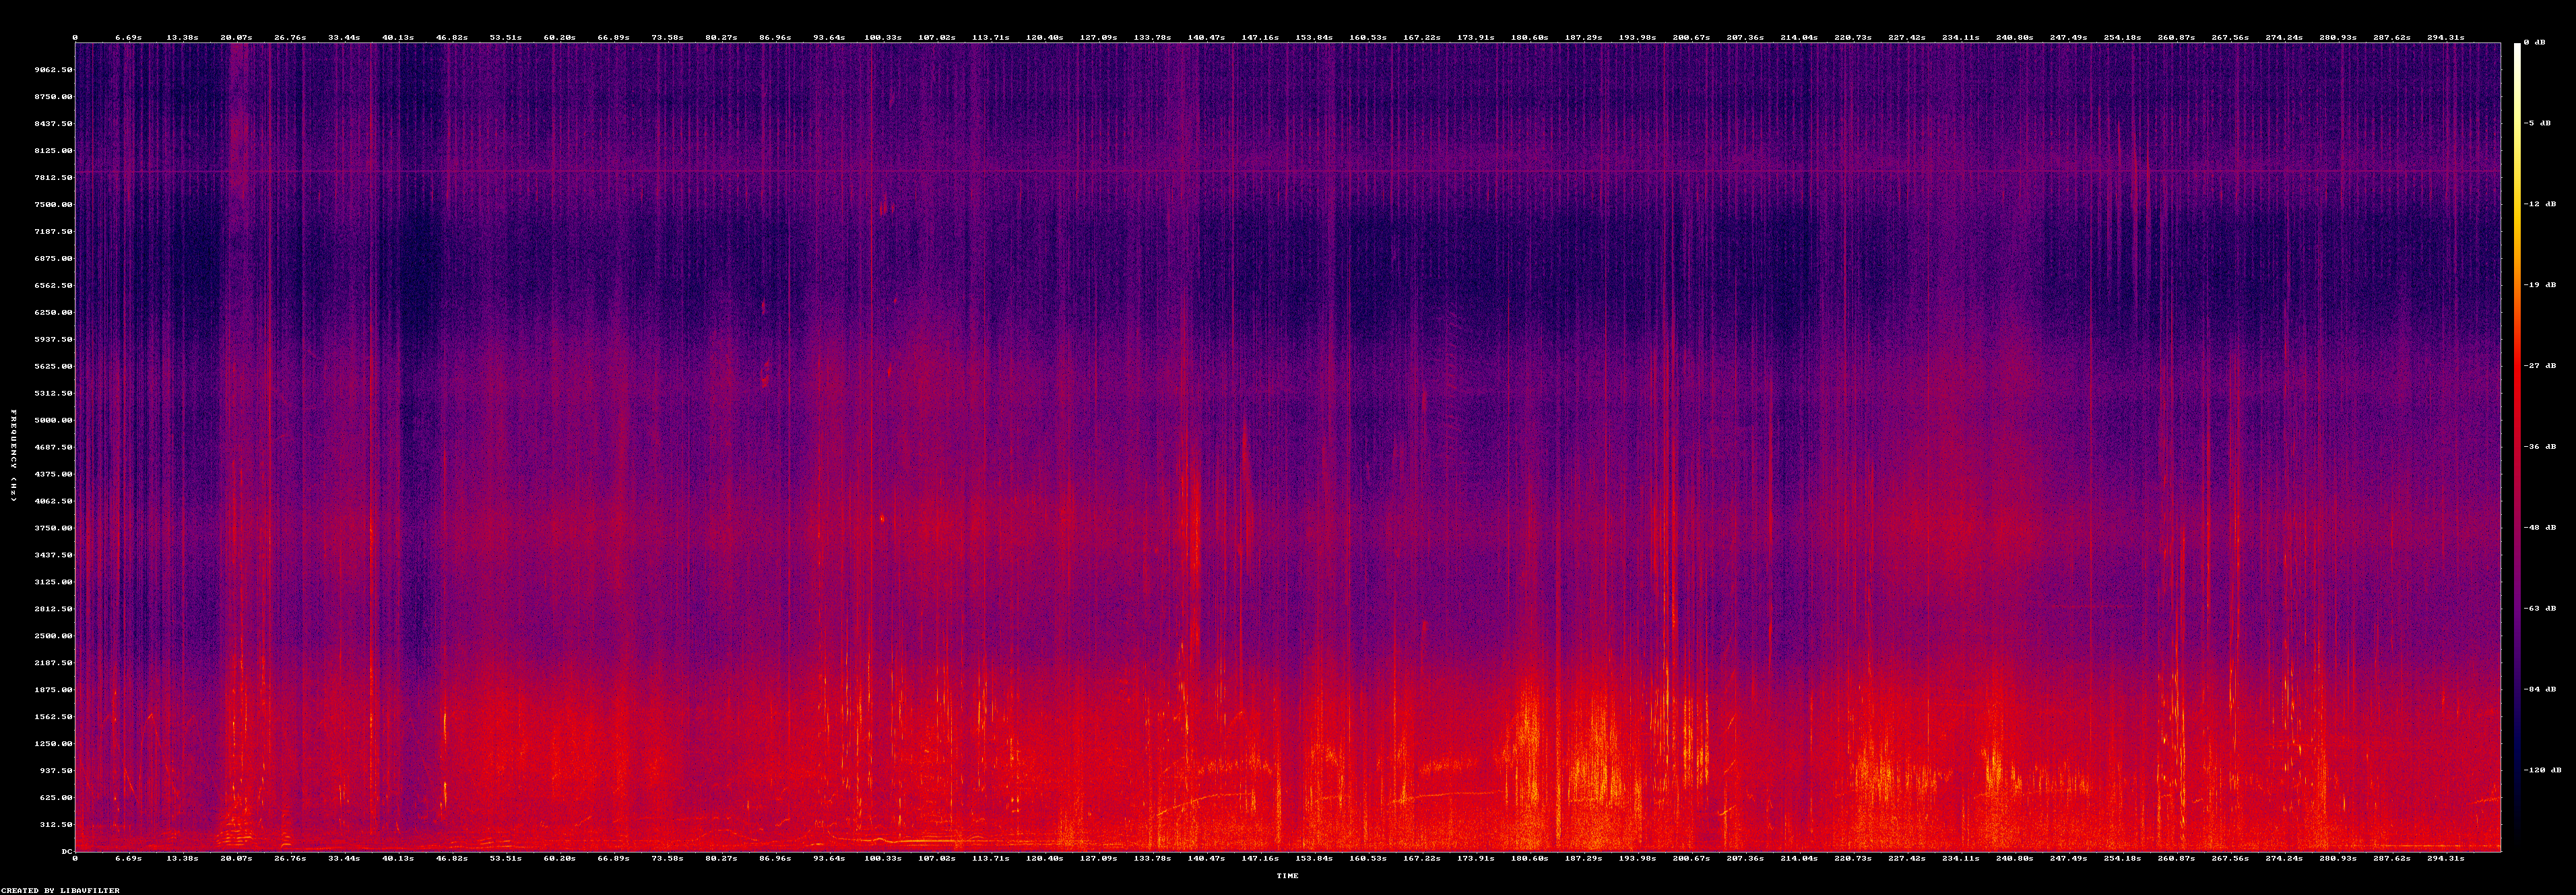
To repeat the process, start with a spectrogram, it helps identify the frequencies visually and more accuratly. Extract the audio channel from a video segment, then create various spectrogram color scales with SoX in high definition.
ffmpeg -i "/home/local/Desktop/REC_0008.MOV" -acodec pcm_s16le -ac 2 "/home/local/Desktop/BandPass/REC_0008.wav"

sox "/home/local/Desktop/BandPass/REC_0008.wav" -n spectrogram -x 3600 -y 1200 -o "/home/local/Desktop/BandPass/REC_0008_Color-HD.png"
sox "/home/local/Desktop/BandPass/REC_0008.wav" -n spectrogram -m -x 3600 -y 1200 -o "/home/local/Desktop/BandPass/REC_0008_Grayscale-HD.png"
sox "/home/local/Desktop/BandPass/REC_0008.wav" -n spectrogram -m -l -x 3600 -y 1200 -o "/home/local/Desktop/BandPass/REC_0008_Negative-HD.png"
I ended up using FFMpeg to create the spectrograms, because SoX was really slow due to the HD scaling. Also, FFMpeg provides greater scale detail, so we can determine the frequency to filter.
ffmpeg -i "/home/local/Desktop/BandPass/REC_0008.wav" -lavfi showspectrumpic=s=3600x1200 "/home/local/Desktop/BandPass/REC_0008_Color-FFMpegHD.png"
Each step of the frequency scale is 312.5 Hz and there are 40 pixels in each of those scales. With that we can assume that each pixel spans a frequency range of 7.8125Hz. From this footage, we can see a high frequency artifact, possibly from the video camera circuitry. Let’s pin point the exact frequency.
It appears at a median of 8 pixels above the 7812.5Hz scale indicator. If we multiply the 8 by 7.8125Hz and add that result to our scale indicator, we should get the median frequency of this artifact, 7875Hz.
Lets run a SoX band reject filter to remove the artifact. We’ll use a bandwidth of 500Hz around the center frequency of 7875Hz. Here is the command to do that.
sox "/home/local/Desktop/BandPass/REC_0008.wav" "/home/local/Desktop/BandPass/REC_0008_BR.wav" sinc 8.125k-7.625k
Now lets spectrogram the results to see if our filter did as intended.
ffmpeg -i "/home/local/Desktop/BandPass/REC_0008_BR.wav" -lavfi showspectrumpic=s=3600x1200 "/home/local/Desktop/BandPass/REC_0008_Color-FFMpegHD-BR.png"
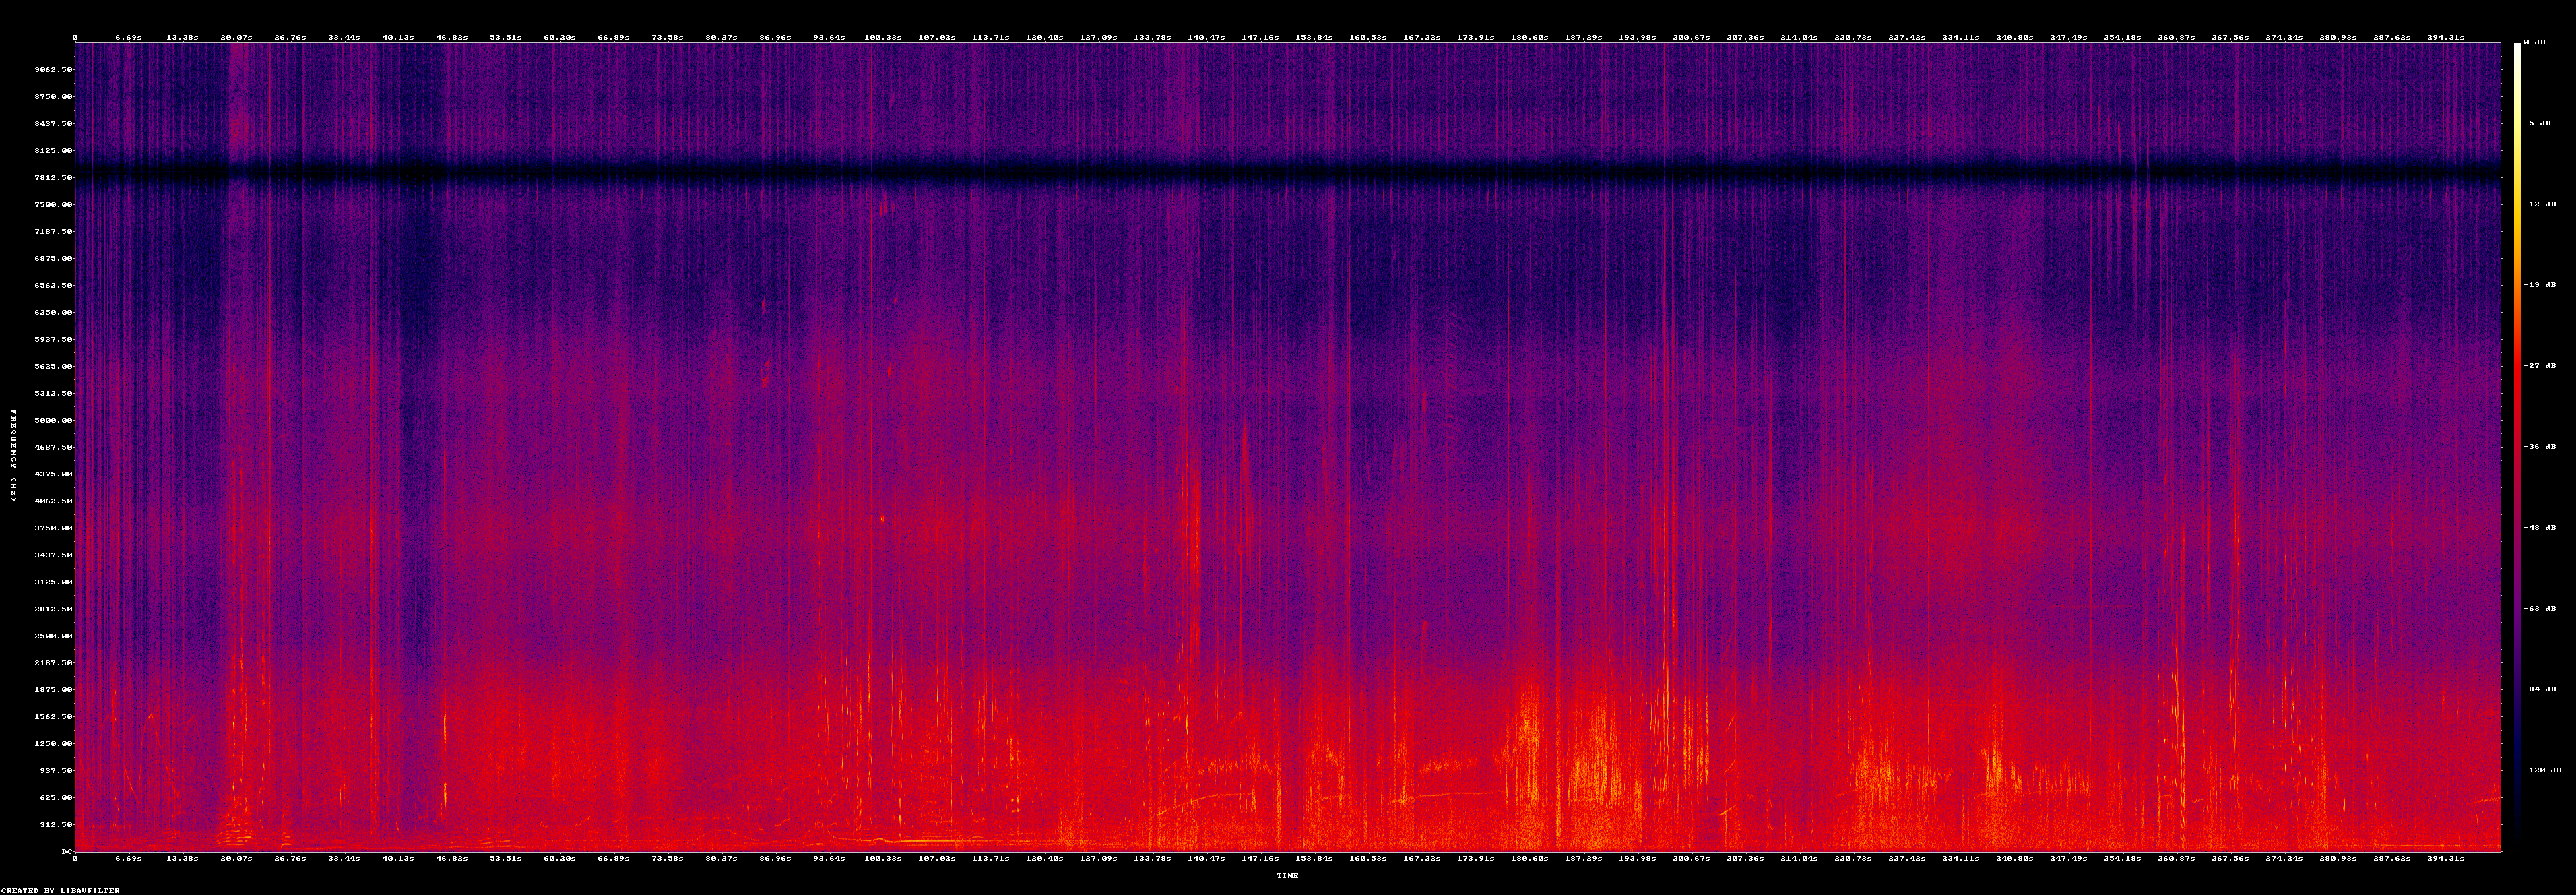
The results show that the artifact is now gone, but now there is a band with a gap. I won’t cover how to fill that gap here, but it can be done by using a band-pass filter on a white noise sample and inserting it into this audio track.
There is much more that can be done with band-pass and band-reject filtering. This is just an introduction on how to use it with SoX. I hope you have enjoyed this topic and look forward to covering more of what SoX can do.