Battery Health
This post will be covering how to determine battery health using a number of methods. It will progress through each of these methods, highlighting some benefits and drawbacks.
One of the easiest ways to test a battery is whether it will power a device or not. Using a voltmeter will provide how much potential is left in a battery. Although these methods are simple, they fail to provide how much life is left in the battery. This can be problem if reliability is a factor.
Measuring internal resistance is another method that uses both a voltmeter and a known load. This video provides more details on the process and the reasoning behind it.
The key takeaway from this is that a baseline should be established. Having an internal resistance value without its relevance provides little in the way of knowing a battery’s usefulness. Measuring a new unused battery, or referencing its data sheet will provide some baseline, but the extent is still unknown without some more information.
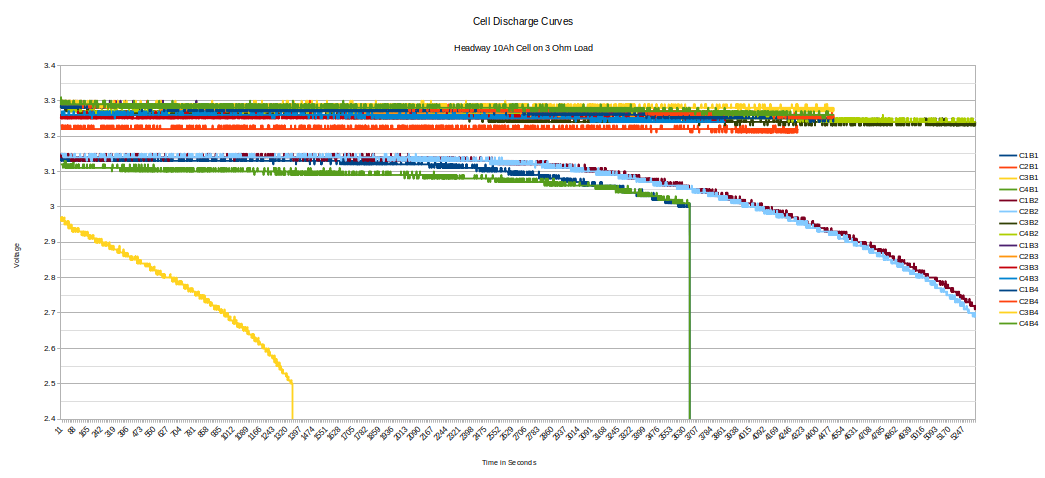
Measuring discharge curves on a load will provide a more complete picture of battery health. The downside of this is the time it takes to take the measurement. If the battery is non-rechargeable, this process will consume the battery.
In this example, an Arduino Uno was used to measure the discharge curve of 4 LiFePo4 cells. Each cell is below the 5 volt limit of Uno analog pins and they were discharged through a fixed value load. Here is the code used.
ReadAnalogVoltage
Reads an analog input on pin 0, converts it to voltage,
and prints the result to the serial monitor.
Graphical representation is available using serial plotter (Tools > Serial Plotter menu)
Attach the center pin of a potentiometer to pin A0, and the outside pins to +5V and ground.
*/

// the setup routine runs once when you press reset:

void setup() {
// initialize serial communication at 9600 bits per second:
Serial.begin(9600);
Serial.print("CellOne");
Serial.print(",");
Serial.print("CellTwo");
Serial.print(",");
Serial.print("CellThree");
Serial.print(",");
Serial.println("CellFour");

}

// the loop routine runs over and over again forever:

void loop() {
int CellOne = analogRead(A0);
int CellTwo = analogRead(A1);
int CellThree = analogRead(A2);
int CellFour = analogRead(A3);
// Convert the analog reading (which goes from 0 - 1023) to a voltage (0 - 5V):
float CellOneVolt = CellOne * (4.93 / 1023.0);
float CellTwoVolt = CellTwo * (4.93 / 1023.0);
float CellThreeVolt = CellThree * (4.93 / 1023.0);
float CellFourVolt = CellFour * (4.93 / 1023.0);
// print out the value you read:
Serial.print(CellOneVolt);
Serial.print(",");
Serial.print(CellTwoVolt);
Serial.print(",");
Serial.print(CellThreeVolt);
Serial.print(",");
Serial.println(CellFourVolt);
delay(1000);
}
The results can be plotted to give a visual of how each cell stacks up.
Taking internal resistance measurements over time could also be applied, although not demonstrated here.
Although this process might be overkill for the average consumer, large scale or mission critical applications might require this.