ESP-32 Cam Low Light Use
This post will cover some use cases of the ESP-32 Cam module in low or no light conditions. The software and hardware of the ESP-32 Cam module will modified for this purpose. Some additional hardware examples will be introduced as well. Lastly, the use of FFMpeg will be demonstrated to further enhance the images gathered from the ESP-32 cam module.
What are some reasons for the ESP-32 Cam module to be used in low or no light environments? The more common reason would be for security or utility, which would monitor property or equipment. Some other uses might be for transportation, such as a dash or helmet camera. Another use case would be for recreational photography or remote control craft cameras.
There are cameras that are targeted for niche markets. These devices are typically designed for intended use in specific environments. This video demo compares a few different cameras for use in night time drone flight.
The costs of these devices are much higher than the ESP-32 Cam module, which at the time of this post was just under $10. For that reason, this post will explore how to use the ESP-32 Cam and its OV2640 camera module, the camera module is manufactured by Omnivision. As a side note, the manufacture’s camera module OV10635 720p sensor has been used as the rear camera for Tesla vehicles.
Software can be used on the ESP-32 Cam module to fine tune the images gathered by the OV2640 sensor. Rui and Sara Santos have extensive information about the ESP-32 available on their website, https://randomnerdtutorials.com. This post covers the OV2640 module settings, https://randomnerdtutorials.com/esp32-cam-ov2640-camera-settings/. The ESP32 Arduino example code is used to establish the best image quality. Bitluni also demonstrated this with this video, details can be found at this link https://bitluni.net/esp32camtimelapse.
Hardware modifications can also be implemented, though this option will require some time or material which will add costs to a project. This post provides details on removal of the IR filter from the OV2640 lens housing, https://marksbench.com/electronics/removing-ir-filter-from-esp32-cam/. The resulting demo is shown on a follow up post, https://marksbench.com/electronics/removing-ir-filter-from-esp32-cam-part-ii/ and https://marksbench.com/electronics/removing-ir-filter-from-esp32-cam-part-iii/. It should be noted that not all manufactured lens housings are universal. This housing shows that the IR filter is deeper in the housing and thus is more difficult to remove.
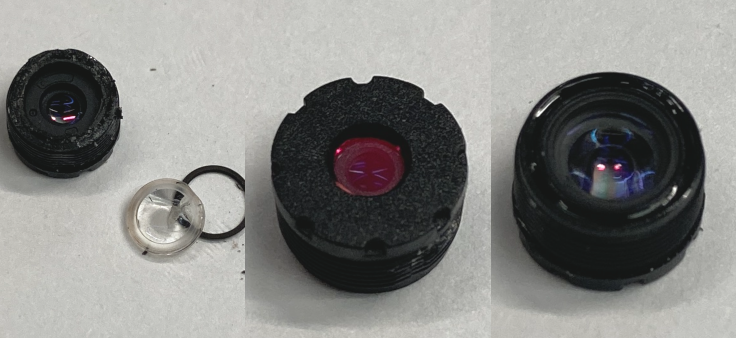
For that reason, it may prove to be more effective to purchase a lens that already has the IR filter removed. This video demonstrates the various Ominvision sensor available for the ESP-32 Cam module.
Sometimes the light level will not be enough for the sensor to detect anything useful. In this scenario, the use of an illuminator will be required. This is what differentiates a sensor from being passive or active. This manufacturer provides IR arrays that are common among security cameras, http://www.feyondcctvled.com/enindex.htm
The ESP-32 module has been used with other non standard image sensors. This video demonstrates to use of a true infra red heat MLX90640 sensor to image objects with the ESP-32 module. It should be noted that the required I/O will limit its use with ESP-32 modules and not the ESP-32 Cam module.
In a previous post, the video feed from the ESP-32 Cam module was streamed to Node-Red. Since this process uses FFMpeg, there are more options and features available that go beyond what is natively available to the ESP-32 module. The following command can be used to overlay a timestamp on a video stream in Node-Red.
"ffmpeg -y -i http://esp-32cam-ip -vf \"drawtext=fontfile=/usr/share/fonts/dejavu/DejaVuSans-Bold.ttf: text='%{localtime\\}': fontcolor=white@0.8: bordercolor=black@0.8: borderw=2: x=500: y=8\" -vframes 1 -f image2pipe -vcodec png -"
FFMpeg also offers an overlay of text from a file, which can be static text, or dynamic text created by another process. This command can be used in Node-Red when using text files as a source, where text.txt is the source text used.
"ffmpeg -y -i http://esp-32cam-ip -vf \"drawtext=fontfile=/usr/share/fonts/dejavu/DejaVuSans-Bold.ttf: textfile=text.txt: fontcolor=white@0.8: bordercolor=black@0.8: borderw=2: x=500: y=8\" -vframes 1 -f image2pipe -vcodec png -"
This next command overlays a transparent png image on top of the video stream, which can mimic a HUD, or outline features that the sensor is unable to detect.
"ffmpeg -y -i http://esp-32cam-ip -i /home/local/node-red-static/image-overlay.png -filter_complex \"[1:v]format=argb,geq=r='r(X,Y)':a='1.0*alpha(X,Y)'[zork]; [0:v][zork]overlay\" -vframes 1 -s 360x240 -f image2pipe -vcodec png -"
The source video can also be processed or enhanced with these commands, the first being gamma correction and the second being image sharpening.
"ffmpeg -y -i http://esp-32cam-ip -vf "eq=gamma=1.8" -vframes 1 -f image2pipe -vcodec png -"
"ffmpeg -y -i http://esp-32cam-ip -vf unsharp=luma_msize_x=9:luma_msize_y=9:luma_amount=3 -vframes 1 -f image2pipe -vcodec png -"
Of course this is not all that FFMpeg can do, which lends itself as an essential tool for this type of work. Although outside the scope of this post, this demonstrates just how powerful FFMpeg is with a text to speech feature, http://johnriselvato.com/ffmpeg-how-to-generate-text-to-speech-audio/
Purpose built cameras do have advantages over the ESP-32 Cam module. However the versatility and customization of the ESP-32 Cam module can provide some insights into how marketed cameras work.