ESP32-Cam OTA Updates
This post addresses the problem of servicing ESP based systems that have been installed. I have built systems where the ESP module is fixed, enclosed, and installed in a location that is difficult to get to once in place. As time progresses, so does the realization that some features will need to be updated on those installed ESP modules. Over The Air updates are the ideal way to update the modules without the hassle or downtime. Here is a detailed explanation from Andreas Spiess about the topic of OTA.
The Arduino IDE lists devices that are OTA ready as an available port. These devices can be programmed just as they would if they were connected with a serial connection. I was able to program ESP8266 modules this way with no trouble. However, I had trouble when I attempted to program ESP32-Cam modules.
This forum had some insights as to why, https://forum.arduino.cc/t/ota-no-response-from-device/577868/6, but my problem persisted.
This post on GitHub gave more insights into the ESP32-Cam module’s issue, https://github.com/sigmdel/ESP32-CAM_OTA
“There is a well-known problem with using the ArduinoOTA library with the AI Thinker ESP32-CAM board and its many clones.”
“The problem has nothing to do with the ArduinoOTA library. Its source is the memory partition in the ESP32-CAM board definition. The esp32cam.build.partition=huge_app setting in the board definition file (board.txt), specifies that most of the memory is allocated to a single app partition (3MiB in size) leaving no room for the uploaded firmware update.”
Turns out it was addressed in this release of the boards.txt file, https://github.com/espressif/arduino-esp32/blob/master/boards.txt
The directive “esp32cam.menu.PartitionScheme” now contains options for partition selection from the Arduino IDE that might be missing for some unaware of the problem. Uploading programs to the ESP32-Cam using OTA worked. This video has comments by viewers that point out the missing menu option.
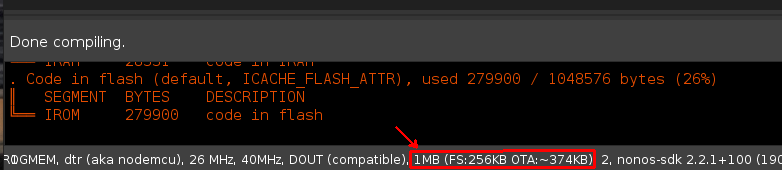
It’s always important to verify the OTA and FS options are correct when compiling. If these settings are overlooked, the resulting firmware may not load properly, or worse will load but manifest as a problem that is difficult to troubleshoot. Take the time to verify the setting is correct for the device being flashed.
The idea of having OTA always on by default isn’t appealing. This provides some insights as to why it could be bad idea to always have it enabled, https://video.tau.ac.il/events/index.php?option=com_k2&view=item&id=8045:dont-let-the-cuteness-fool-you&Itemid=559.
Fortunately, OTA is a function and it can be called as needed. Placing that function in a conditional call allows one to start OTA on the ESP module prior to uploading firmware. When the ESP module reboots with the new firmware, OTA will not be on. Here is code with the OTA in a function.
#include <ArduinoOTA.h>

int programflag = 0;


void OTABeginInstance() {

  // Port defaults to 3232
  ArduinoOTA.setPort(3232);

  // Hostname defaults to esp3232-[MAC]
  ArduinoOTA.setHostname("ESP32-Cam");

  // No authentication by default
  // ArduinoOTA.setPassword("password_here");

  // Password can be set with it's md5 value as well
  // MD5(admin) = md5_hash_here
  // ArduinoOTA.setPasswordHash("md5_hash_here");

  ArduinoOTA.begin();

}

void OTAReady() {
  ArduinoOTA.handle();
}

void TriggerMyFunctions() {

  // Your meaningful code here with a condition you trigger
  // if statement to check your trigger
  // if true then set programflag = 1 and call function OTABeginInstance()

}

void loop() {

  // Your meaningful code here
  TriggerMyFunctions();

  if (programflag > 0) { // this only runs if you trigger it
    OTAReady();
  }

}
Rui and Sara detail steps on how to install firmware that doesn’t require the Arduino IDE. Here is a link, https://randomnerdtutorials.com/esp32-over-the-air-ota-programming/. They also provide details on how to create the binary file needed in this link, https://randomnerdtutorials.com/bin-binary-files-sketch-arduino-ide/
The OTAWebUpdater does have some flaws you should consider before using it beyond getting familiar with OTA or debugging. The example OTAWebUpdater exposes the username and password, or can be bypassed. The connection is via HTTP and can be packet sniffed and the login can be viewed in plain text. The source can be viewed via the browser debug tools without any authentication and it contains the login info, “if(form.userid.value==’admin’ && form.pwd.value==’admin’)”
Lastly, the login form can be bypassed altogether by opening the page directly, “window.open(‘/serverIndex’)”, in this case http://website/serverIndex. Here is a video with some more insights into the topic of securing IoT devices.
For the sake of simplicity and to make the topic digestible to those new to the subject, we’ll forgo security for now. Just do be aware that this is only to demonstrate the fundamentals before delving into more advanced secure methods.
This code base used the “httpUpdate” example included with the board library. These were the minimal required lines to get the ESP module to get its firmware directly from a web server.
// These are the Libraries and Definitions used
#include <HTTPUpdate.h>
#include <WiFiClient.h>
WiFiClient espClient;

// This line is the workhorse with messageTemp being a variable that can be set any number of ways
t_httpUpdate_return ret = httpUpdate.update(espClient, "http://<website>/" + messageTemp + ".bin");
Using SSL with the “httpUpdateSecure” only required a few more lines of code. Add the time library “#include <time.h>”. Setting and calling the “setClock()” function, correct time is required for cryptography. Setting the cert variable “const char* rootCACertificate”. Applying the client cert with “client.setCACert(rootCACertificate);”. Setting a longer timeout to tolerate ssl latency with “client.setTimeout(12000 / 1000);”. Then make the secure web request with the following lines of code.
t_httpUpdate_return ret = httpUpdate.update(client, "https://<website>/" + messageTemp + ".bin");
// Or:
//t_httpUpdate_return ret = httpUpdate.update(client, "server", 443, "/file.bin");
All of these examples should satisfy most of the OTA needs developers have. This last example will demonstrate how to use Node-Red and MQTT to check and apply firmware updates on demand. Here are the nodes used.

[{"id":"d91e2413.c522e","type":"http in","z":"612c5528.096aa4","name":"","url":"/get-firmware-path","method":"get","upload":false,"swaggerDoc":"","x":160,"y":140,"wires":[["d77bfa42.a1998"]]},{"id":"d77bfa42.a1998","type":"function","z":"612c5528.096aa4","name":"Uncomment FIrmware to use","func":"// msg.payload = \"http://<website>/ESP32-Cam_ver3.bin\";\nmsg.payload = \"http://<website>/ESP32-Cam_ver4.bin\";\n// msg.payload = \"http://<website>/ESP32-Cam_ver2.bin\";\nreturn msg;","outputs":1,"noerr":0,"x":440,"y":140,"wires":[["f2d184ec.a85188"]]},{"id":"f2d184ec.a85188","type":"http response","z":"612c5528.096aa4","name":"","statusCode":"200","headers":{},"x":680,"y":140,"wires":[]}]
Here is the ESP module code used.
//Your Domain name with URL path or IP address with path
const char* firmware_server = "http://node-red-server:1880/get-firmware-path";
String FirmwarePath;

// MQTT Functions
  if (String(topic) == "ESP32-Cam/HTTP-Get") {
    if(messageTemp == "CheckFirmware"){
      FirmwarePath = httpGETRequest(firmware_server);
    }
  }
  if (String(topic) == "ESP32-Cam/HTTP-Get") {
    if(messageTemp == "UpdateFirmware"){
      FirmwarePath = httpGETRequest(firmware_server);
      t_httpUpdate_return ret = httpUpdate.update(espClient, FirmwarePath);
    }
  }

// HTTP Get Functions

UpdateStats Function
    MQTTclient.publish("ESP32-Cam/FirmwarePath",FirmwarePath.c_str());
Here are the nodes that initiate the update.
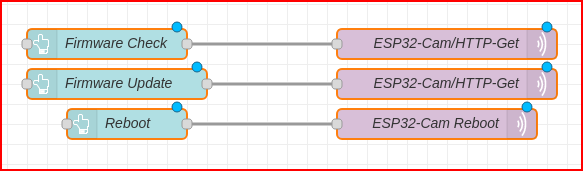
[{"id":"e14f9eab.e9fde","type":"ui_button","z":"98736f63603298d2","name":"Firmware Check","group":"34f13621dd653575","order":7,"width":"3","height":"1","passthru":false,"label":"Firmware Check","tooltip":"","color":"#585858","bgcolor":"#242424","className":"","icon":"","payload":"CheckFirmware","payloadType":"str","topic":"ESP32-Cam/HTTP-Get","topicType":"str","x":220,"y":1140,"wires":[["2c7f498e.9a51a6"]]},{"id":"5cdad6ab.c066a","type":"ui_button","z":"98736f63603298d2","name":"Reboot","group":"34f13621dd653575","order":10,"width":"3","height":"1","passthru":false,"label":"Reboot","tooltip":"","color":"#585858","bgcolor":"#242424","className":"","icon":"","payload":"Reboot","payloadType":"str","topic":"ESP32-Cam/Reboot","topicType":"str","x":240,"y":1220,"wires":[["16349782.1c7b78"]]},{"id":"16349782.1c7b78","type":"mqtt out","z":"98736f63603298d2","name":"ESP32-Cam Reboot","topic":"ESP32-Cam/Reboot","qos":"0","retain":"","broker":"e2a9f9e3.196b88","x":550,"y":1220,"wires":[]},{"id":"2c7f498e.9a51a6","type":"mqtt out","z":"98736f63603298d2","name":"ESP32-Cam/HTTP-Get","topic":"ESP32-Cam/HTTP-Get","qos":"0","retain":"","respTopic":"","contentType":"","userProps":"","correl":"","expiry":"","broker":"e2a9f9e3.196b88","x":560,"y":1140,"wires":[]},{"id":"b386b4db031f8dc8","type":"ui_button","z":"98736f63603298d2","name":"Firmware Update","group":"34f13621dd653575","order":7,"width":"3","height":"1","passthru":false,"label":"Firmware Update","tooltip":"","color":"#585858","bgcolor":"#242424","className":"","icon":"","payload":"UpdateFirmware","payloadType":"str","topic":"ESP32-Cam/HTTP-Get","topicType":"str","x":230,"y":1180,"wires":[["e5bd7537571b975b"]]},{"id":"e5bd7537571b975b","type":"mqtt out","z":"98736f63603298d2","name":"ESP32-Cam/HTTP-Get","topic":"ESP32-Cam/HTTP-Get","qos":"0","retain":"","respTopic":"","contentType":"","userProps":"","correl":"","expiry":"","broker":"e2a9f9e3.196b88","x":560,"y":1180,"wires":[]},{"id":"34f13621dd653575","type":"ui_group","name":"MQTT HTTP Get Updater","tab":"e64da5d729314ca1","order":1,"disp":true,"width":"7","collapse":false,"className":""},{"id":"e2a9f9e3.196b88","type":"mqtt-broker","name":"BrokerName","broker":"BrokerServer","port":"1883","clientid":"","usetls":false,"keepalive":"60","cleansession":true,"birthTopic":"","birthQos":"0","birthPayload":"","closeTopic":"","closePayload":"","willTopic":"","willQos":"0","willPayload":""},{"id":"e64da5d729314ca1","type":"ui_tab","name":"Dev 1","icon":"dashboard","order":9,"disabled":false,"hidden":false}]
Now when the ESP module runs, it’s firmware can be managed through Node-Red. All of these methods of OTA make managing updates on the ESP module easier, some more secure than others. In all, with proper firmware methodology, the task of updating devices is streamlined.