FlySky iBus Interface
The FlySky TX has some interesting features that allow it to display sensor readings from a RX. Having a ground based data logger made looking into this worthwhile. This post will cover the process used by the FlySky for sensor readings as well as interfacing micro controllers as a sensor source. There is a community of developers that have done a bulk of the work presented here and an effort will be made to give credit to them.
The FlySky RX is the receiving radio device that has 2 way radio communication with the TX. It also has its own set of protocols to interface with peripherals that connect to it, such as servos. Traditionally, servos are controlled with PWM signals from the RX. The FlySky RX also has a proprietary protocol called iBus which is a serial protocol that physically connects to peripherals in a daisy chain.
Contributors to Betaflight have provided details about iBus which is available here, https://github.com/betaflight/betaflight/wiki/Single-wire-FlySky-(IBus)-telemetry. For those of you new to Betaflight, that is a flight controller software platform that was forked from Cleanflight, http://cleanflight.com/ and https://github.com/cleanflight/cleanflight. The main take away is the identification process iBus uses to determine the sensor type. FlySky iBus supports numerous sensor types which identify themselves with 0x00 to 0xFF hex values.
This project contains more details about iBus support with microcontrollers, https://github.com/bmellink/IBusBM. The IBusBM.h in the source has a narrow selection of sensor types, but makes reference to another source:
https://github.com/cleanflight/cleanflight/blob/7cd417959b3cb605aa574fc8c0f16759943527ef/src/main/telemetry/ibus_shared.h. This list is included in some of my code examples as a reference. As pointed out, the sensor list is extensive and has the potential to provide operators with much detail. This page provides a glimpse at that, https://github.com/qba667/FlySkyI6/wiki/Telemetry.
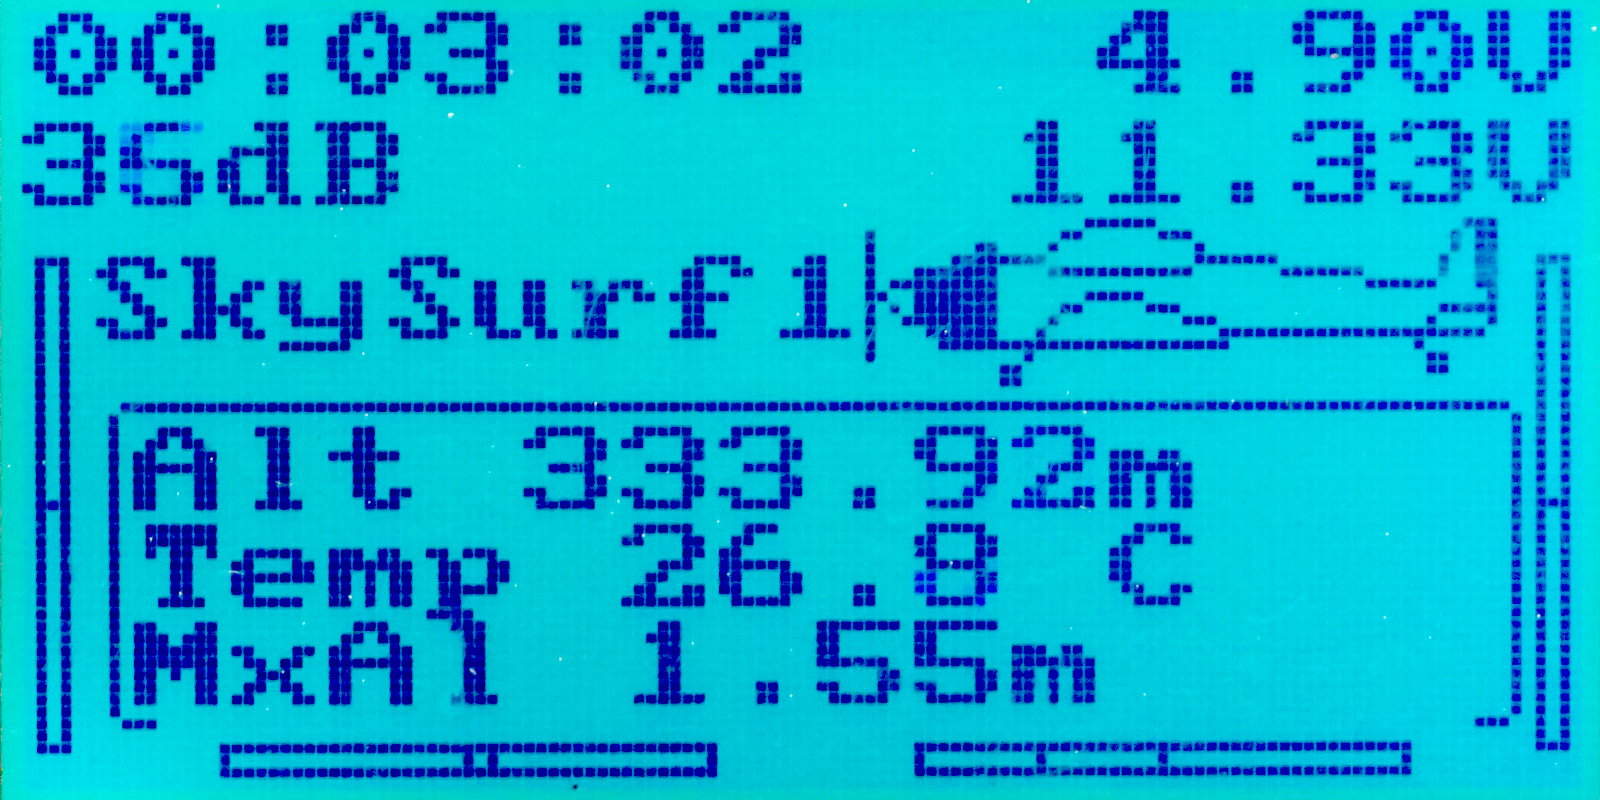
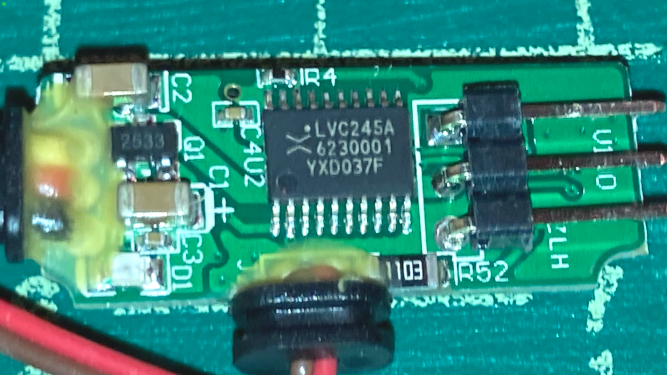
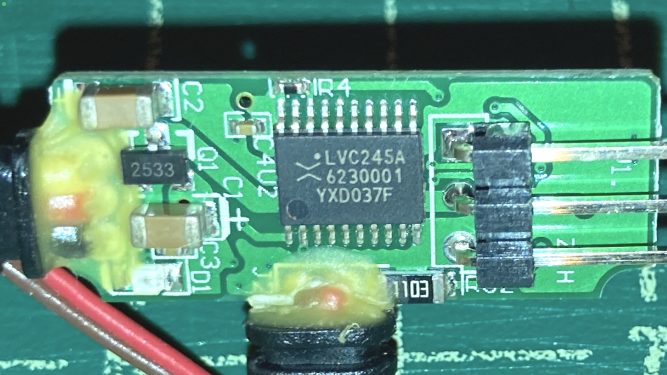
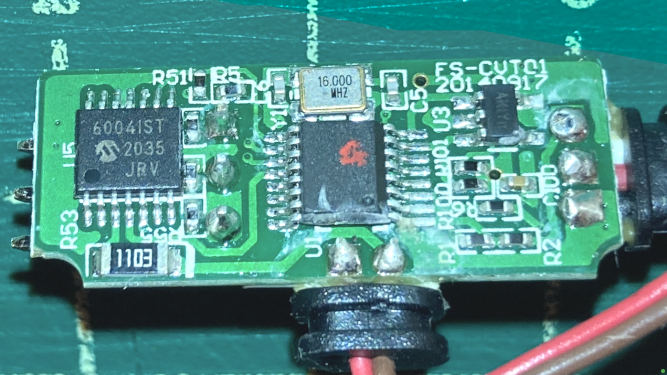
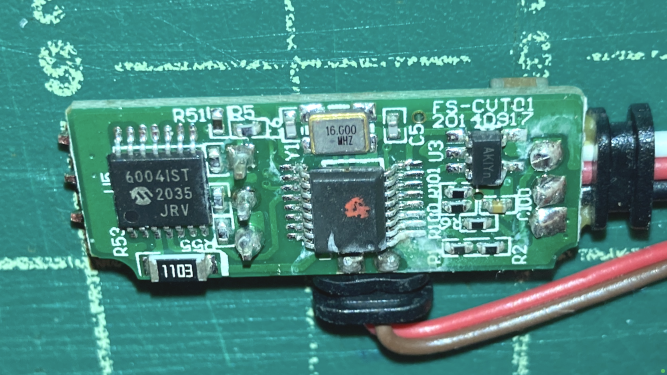
FlySky provides a range of prebuilt iBus sensors, some of which are demonstrated here.
The cost of these sensors are reasonable for those not comfortable with lower level electronics. For the sake of knowing, a voltage sensor was purchased with its photos below. This sensor design looks like it’s dated from 2014 and it has a mystery chip with no labeling. The photos were taken on a 1/2 inch grid drafting mat to give a sense of scale, these are small devices.

Mimicking one of these sensors with an Arduino Uno is demonstrated by this developer, https://github.com/adis1313/iBUSTelemetry-Arduino/. It was simpler than other methods that required multiple serial ports, resistors, and diodes. All that was needed were 3 connections, 5 volts, ground, and the signal wire. In addition, the signal wire connection can be defined to pins D8 to D13, which gives more flexibility. These changes were made to the code base to mimic temperature and rmp sensors.
/**

iBus_Sensor_SerialDebug_ver1.ino
FlySky RX iBus Sensor Emulator on Arduino Uno
Debug on Serial Port
Nov 4th, 2021 - 0534

**/

/*

https://github.com/adis1313/iBUSTelemetry-Arduino/blob/master/examples/iBUSTelemetry_example/iBUSTelemetry_example.ino
https://github.com/adis1313/iBUSTelemetry-Arduino/archive/refs/heads/master.zip

*/


// Libraries

#include <iBUSTelemetry.h>


// Variables and Constants

#define UPDATE_INTERVAL 500
#define TEMPBASE 400    // base value for 0'C

iBUSTelemetry IBus(11); // Pin 11 of Arduino Uno connects to FlySky RX iBus

uint32_t prevMillis = 0; // Necessary to updateValues() method. Look below.


// sensor values
uint16_t rpm=1000;
uint16_t temp=TEMPBASE+100; // start at 10'C


// Hardware Initialization Routine
void HardwareInit()
{

  IBus.begin(); // Let's start having fun!

  // adding 2 sensors
  // Reference https://github.com/adis1313/iBUSTelemetry-Arduino/blob/master/iBUSSensors.h
  // Commented list below for reference
  IBus.addSensor(0x07); // RPM
  IBus.addSensor(0x01); // Temp


  /*


    NONE             = 0x00,
    TEMPERATURE      = 0x01,
    RPM_FLYSKY       = 0x02,
    EXTERNAL_VOLTAGE = 0x03,
    CELL             = 0x04, // Avg Cell voltage
    BAT_CURR         = 0x05, // battery current A * 100
    FUEL             = 0x06, // remaining battery percentage / mah drawn otherwise or fuel level no unit!
    RPM              = 0x07, // throttle value / battery capacity
    CMP_HEAD         = 0x08, //Heading  0..360 deg, 0=north 2bytes
    CLIMB_RATE       = 0x09, //2 bytes m/s *100
    COG              = 0x0a, //2 bytes  Course over ground(NOT heading, but direction of movement) in degrees * 100, 0.0..359.99 degrees. unknown max uint
    GPS_STATUS       = 0x0b, //2 bytes
    ACC_X            = 0x0c, //2 bytes m/s *100 signed
    ACC_Y            = 0x0d, //2 bytes m/s *100 signed
    ACC_Z            = 0x0e, //2 bytes m/s *100 signed
    ROLL             = 0x0f, //2 bytes deg *100 signed
    PITCH            = 0x10, //2 bytes deg *100 signed
    YAW              = 0x11, //2 bytes deg *100 signed
    VERTICAL_SPEED   = 0x12, //2 bytes m/s *100
    GROUND_SPEED     = 0x13, //2 bytes m/s *100 different unit than build-in sensor
    GPS_DIST         = 0x14, //2 bytes dist from home m unsigned
    ARMED            = 0x15, //2 bytes
    FLIGHT_MODE      = 0x16, //2 bytes
    PRES             = 0x41, // Pressure
    ODO1             = 0x7c, // Odometer1
    ODO2             = 0x7d, // Odometer2
    SPE              = 0x7e, // Speed 2bytes km/h
    GPS_LAT          = 0x80, //4bytes signed WGS84 in degrees * 1E7
    GPS_LON          = 0x81, //4bytes signed WGS84 in degrees * 1E7
    GPS_ALT          = 0x82, //4bytes signed!!! GPS alt m*100
    ALT              = 0x83, //4bytes signed!!! Alt m*100
    ALT_MAX          = 0x84, //4bytes signed MaxAlt m*100
    ALT_FLYSKY       = 0xf9, // Altitude 2 bytes signed in m
    GPS_FULL         = 0xfd,
    VOLT_FULL        = 0xf0,
    ACC_FULL         = 0xef,
    UNKNOWN          = 0xff,


  */

  Serial.begin(115200);
  Serial.println("Start iBUS sensor");

}


void setup()
{
  HardwareInit();
}


void loop()
{
    InboundData(); // Very important! iBUS protocol is very sensitive to timings.
                    // DO NOT USE ANY delay()! Look at updateValues() method.
                    // It's an example of how to use intervals without delays.

    IBus.run(); //It must be here. Period.
}


void InboundData()
{
    uint32_t currMillis = millis();

    if (currMillis - prevMillis >= UPDATE_INTERVAL) { // Code in the middle of these brackets will be performed every 500ms.
        prevMillis = currMillis;

        IBus.setSensorValue(1,rpm); // Now, you have two ways to set sensors values. Using floating point variables
                                    // or directly in 32bit integer, but then you have to format variable by yourself.
                                    // Ex.: telemetry.setSensorValueFP(1, 24.45); is equivalent to telemetry.setSensorValue(1, 2445);
                                    // The values differ for different sensors.
        rpm += 10;                  // increase motor speed by 10 RPM

        IBus.setSensorValue(2,temp++); // increase temperature by 0.1 'C every loop

        Serial.print("RPM=");
        Serial.print(rpm);
        Serial.print(" Temp=");
        Serial.println((temp-TEMPBASE)/10.);


    }
}
It’s basically a counter that increases the values to the 2 sensor variables. Those variables are passed to the RX which in turn become available on the TX once it is bound. Having actual sensor readings was based off of this project that can be found here, https://electropeak.com/learn/arduino-determining-pressure-altitude-using-bosch-bmp180/. This leveraged the GY-68 sensors that had been sourced for an earlier project. You can also reference this code base, however it is not native to the Arduino IDE, https://github.com/Yenya/ibus-altitude-sensor
/**

iBus_Sensor_BarometricSensor_ver4.3.ino
FlySky RX iBus Sensor Emulator on Arduino Uno with GY-68 BMP085 Module
Debug on Serial Port
Nov 5th, 2021 - 0529

**/


// Libraries

#include <iBUSTelemetry.h>
#include <Wire.h>
#include <SFE_BMP180.h>


// Variables and Constants

iBUSTelemetry IBus(11); // Pin 11 of Arduino Uno connects to FlySky RX iBus
SFE_BMP180 dps;

#define UPDATE_INTERVAL 500

double baseline;
double T,P,p0,a;

uint32_t prevMillis = 0; // Necessary to updateValues() method. Look below.

const int analogInPin = A3;
int ExtVoltage = 0;
float ReadVolts = 0;
// sensor values
long GY68Temp=0;
long GY68Alt=0;


// Hardware Initialization Routine
void HardwareInit()
{

  dps.begin();
  baseline = getPressure();

  IBus.begin(); // Let's start having fun!

  // Reference https://github.com/adis1313/iBUSTelemetry-Arduino/blob/master/iBUSSensors.h

  IBus.addSensor(0x01); // Temperature
  IBus.addSensor(0x03); // External Voltage
  IBus.addSensor(0x07); // Had to use RPM sensor for Altitude readings

  Serial.begin(115200);
  Serial.println("Start iBUS sensor");

}


void setup()
{
  HardwareInit();
}


void loop()
{

    InboundData(); // Very important! iBUS protocol is very sensitive to timings.
                    // DO NOT USE ANY delay()! Look at updateValues() method.
                    // It's an example of how to use intervals without delays.

    IBus.run(); //It must be here. Period.
}


void InboundData()
{
    uint32_t currMillis = millis();

    if (currMillis - prevMillis >= UPDATE_INTERVAL) { // Code in the middle of these brackets will be performed every 500ms.
        prevMillis = currMillis;

        SensorData();

        IBus.setSensorValue(1,GY68Temp);
        IBus.setSensorValue(2,ExtVoltage);
        IBus.setSensorValue(3,GY68Alt);

        Serial.print("Temp=");
        Serial.print((9.0/5.0)*(GY68Temp/10)+32.0,2);
        Serial.print(" F");
        Serial.print(" Volt=");
        ReadVolts = ExtVoltage;
        Serial.print(ReadVolts/100, 2);
        Serial.print(" Altitude: ");
        if (a >= 0.0) Serial.print(" "); // add a space for positive numbers
        Serial.print(a,1);
        Serial.println(" M");


    }
}


void SensorData()
{

  P = getPressure();

  a = dps.altitude(P,baseline);

  GY68Temp = (T*10); 	// Temp in C for FlySky
  GY68Alt = a,1; 	// Altitude in M for FlySky

  ExtVoltage = analogRead(analogInPin);
  ExtVoltage = (0.468*ExtVoltage*2);

}


double getPressure()
{

  dps.startTemperature();
  delay(20);
  dps.getTemperature(T);

  dps.startPressure(3);
  delay(20);
  dps.getPressure(P,T);

  return(P);
}
The sensor provided debug values as expected, but the TX pressure readings were incorrect. There were various code versions made to try and locate the issue, which ultimately was a 2 byte limit passed by the code to the RX iBus.
/**

iBus_Sensor_SerialDebug_ver1.3.ino
FlySky RX iBus Sensor Emulator on Arduino Uno
Debug on Serial Port
Finding Valid Values for Altimeter
Nov 7th, 2021 - 0800

**/

/*

https://github.com/adis1313/iBUSTelemetry-Arduino/blob/master/examples/iBUSTelemetry_example/iBUSTelemetry_example.ino
https://github.com/adis1313/iBUSTelemetry-Arduino/archive/refs/heads/master.zip

*/


// Libraries

#include <iBUSTelemetry.h>


// Variables and Constants

#define UPDATE_INTERVAL 500
#define TEMPBASE 400    // base value for 0'C

iBUSTelemetry IBus(11); // Pin 11 of Arduino Uno connects to FlySky RX iBus

uint32_t prevMillis = 0; // Necessary to updateValues() method. Look below.


// sensor values
uint32_t Pressure=1100;
// Pressure measurement range of 300 to 1100hPa


// Hardware Initialization Routine
void HardwareInit()
{

  IBus.begin(); // Let's start having fun!

  // adding 2 sensors
  // Reference https://github.com/adis1313/iBUSTelemetry-Arduino/blob/master/iBUSSensors.h
  // Commented list below for reference
  IBus.addSensor(0x41); // Pressure
  			 // See https://github.com/qba667/FlySkyI6/wiki/Telemetry, mentions pressure is a 4 byte sensor try uint32_t


  /*


    NONE             = 0x00,
    TEMPERATURE      = 0x01,
    RPM_FLYSKY       = 0x02,
    EXTERNAL_VOLTAGE = 0x03,
    CELL             = 0x04, // Avg Cell voltage
    BAT_CURR         = 0x05, // battery current A * 100
    FUEL             = 0x06, // remaining battery percentage / mah drawn otherwise or fuel level no unit!
    RPM              = 0x07, // throttle value / battery capacity
    CMP_HEAD         = 0x08, //Heading  0..360 deg, 0=north 2bytes
    CLIMB_RATE       = 0x09, //2 bytes m/s *100
    COG              = 0x0a, //2 bytes  Course over ground(NOT heading, but direction of movement) in degrees * 100, 0.0..359.99 degrees. unknown max uint
    GPS_STATUS       = 0x0b, //2 bytes
    ACC_X            = 0x0c, //2 bytes m/s *100 signed   int16_t
    ACC_Y            = 0x0d, //2 bytes m/s *100 signed   int16_t
    ACC_Z            = 0x0e, //2 bytes m/s *100 signed   int16_t
    ROLL             = 0x0f, //2 bytes deg *100 signed   int16_t
    PITCH            = 0x10, //2 bytes deg *100 signed   int16_t
    YAW              = 0x11, //2 bytes deg *100 signed   int16_t
    VERTICAL_SPEED   = 0x12, //2 bytes m/s *100   uint16_t
    GROUND_SPEED     = 0x13, //2 bytes m/s *100 different unit than build-in sensor   uint16_t
    GPS_DIST         = 0x14, //2 bytes dist from home m unsigned   uint16_t
    ARMED            = 0x15, //2 bytes   uint16_t
    FLIGHT_MODE      = 0x16, //2 bytes   uint16_t
    PRES             = 0x41, // Pressure
    ODO1             = 0x7c, // Odometer1
    ODO2             = 0x7d, // Odometer2
    SPE              = 0x7e, // Speed 2bytes km/h   uint16_t
    GPS_LAT          = 0x80, //4bytes signed WGS84 in degrees * 1E7  int32_t
    GPS_LON          = 0x81, //4bytes signed WGS84 in degrees * 1E7  int32_t
    GPS_ALT          = 0x82, //4bytes signed!!! GPS alt m*100   int32_t
    ALT              = 0x83, //4bytes signed!!! Alt m*100   int32_t
    ALT_MAX          = 0x84, //4bytes signed MaxAlt m*100   int32_t
    ALT_FLYSKY       = 0xf9, // Altitude 2 bytes signed in m   int16_t
    GPS_FULL         = 0xfd,
    VOLT_FULL        = 0xf0,
    ACC_FULL         = 0xef,
    UNKNOWN          = 0xff,


  */

  Serial.begin(115200);
  Serial.println("Start iBUS sensor");

}


void setup()
{
  HardwareInit();
}


void loop()
{
    InboundData(); // Very important! iBUS protocol is very sensitive to timings.
                    // DO NOT USE ANY delay()! Look at updateValues() method.
                    // It's an example of how to use intervals without delays.

    IBus.run(); //It must be here. Period.
}


void InboundData()
{
    uint32_t currMillis = millis();

    if (currMillis - prevMillis >= UPDATE_INTERVAL) { // Code in the middle of these brackets will be performed every 500ms.
        prevMillis = currMillis;

  if (Pressure < 300) { // Reset pressure once lowest valid value is reached
    Pressure = 1100; 	 // Set pressure value back to highest valid value
    }

        IBus.setSensorValue(1,Pressure*100); // sensor value rolls at 65536 because of this, uint16_t.  Fix with Math?

        Serial.print("Pressure=");
        Serial.println(Pressure); // debug of sensor value, if this is correct and the TX is wrong, then FlySky can't do it

        Pressure = Pressure-5; // Decrease Pressure, same as Gain Altitude

    }
}
The FlySky TX has a baseline pressure value that can be set manually. That value is used to calculate altitude from pressure readings from a sensor. Although the sensor variable was defined as 4 bytes (uint32_t), the code rolled the values at 2 bytes. Even with the counter code above to force the 4 byte value, the iBUSTelemetry.h inherent 2 byte limit prevents the TX from converting pressure reading to altitude with its internal process. So reading 4 byte sensors is not an option with that library.
The primary goal of this research was to determine if and how ground based data logging could be performed with the TX. The controller does have a serial connection, however its stock firmware is not designed to pass telemetry data through it. It might be possible with third party firmware or device that mimics a tethered controller in a student / teacher configuration. But development of that scale is outside the scope of this research.
Eventually the following code was adopted that was a bit of a hack to get altitude readings on the TX. It uses the RPM defined sensor as an altitude reading. When powered on, the microcontroller establishes the base altitude from the sensor. As the sensor changes altitude, that reading is reflected on the TX.
/**

iBus_Sensor_BarometricSensor_ver4.3.ino
FlySky RX iBus Sensor Emulator on Arduino Uno with GY-68 BMP085 Module
Debug on Serial Port
Nov 5th, 2021 - 0529

**/


// Libraries

#include <iBUSTelemetry.h>
#include <Wire.h>
#include <SFE_BMP180.h>


// Variables and Constants

iBUSTelemetry IBus(11); // Pin 11 of Arduino Uno connects to FlySky RX iBus
SFE_BMP180 dps;

#define UPDATE_INTERVAL 500

double baseline;
double T,P,p0,a;

uint32_t prevMillis = 0; // Necessary to updateValues() method. Look below.

const int analogInPin = A3;
int ExtVoltage = 0;
float ReadVolts = 0;
// sensor values
long GY68Temp=0;
long GY68Alt=0;


// Hardware Initialization Routine
void HardwareInit()
{

  dps.begin();
  baseline = getPressure();

  IBus.begin(); // Let's start having fun!

  // Reference https://github.com/adis1313/iBUSTelemetry-Arduino/blob/master/iBUSSensors.h

  IBus.addSensor(0x01); // Temperature
  IBus.addSensor(0x03); // External Voltage
  IBus.addSensor(0x07); // Had to use RPM sensor for Altitude readings

  Serial.begin(115200);
  Serial.println("Start iBUS sensor");

}


void setup()
{
  HardwareInit();
}


void loop()
{

    InboundData(); // Very important! iBUS protocol is very sensitive to timings.
                    // DO NOT USE ANY delay()! Look at updateValues() method.
                    // It's an example of how to use intervals without delays.

    IBus.run(); //It must be here. Period.
}


void InboundData()
{
    uint32_t currMillis = millis();

    if (currMillis - prevMillis >= UPDATE_INTERVAL) { // Code in the middle of these brackets will be performed every 500ms.
        prevMillis = currMillis;

        SensorData();

        IBus.setSensorValue(1,GY68Temp);
        IBus.setSensorValue(2,ExtVoltage);
        IBus.setSensorValue(3,GY68Alt);

        Serial.print("Temp=");
        Serial.print((9.0/5.0)*(GY68Temp/10)+32.0,2);
        Serial.print(" F");
        Serial.print(" Volt=");
        ReadVolts = ExtVoltage;
        Serial.print(ReadVolts/100, 2);
        Serial.print(" Altitude: ");
        if (a >= 0.0) Serial.print(" "); // add a space for positive numbers
        Serial.print(a,1);
        Serial.println(" M");


    }
}


void SensorData()
{

  P = getPressure();

  a = dps.altitude(P,baseline);

  GY68Temp = (T*10); 	// Temp in C for FlySky
  GY68Alt = a,1; 	// Altitude in M for FlySky

  ExtVoltage = analogRead(analogInPin);
  ExtVoltage = (0.468*ExtVoltage*2);

}


double getPressure()
{

  dps.startTemperature();
  delay(20);
  dps.getTemperature(T);

  dps.startPressure(3);
  delay(20);
  dps.getPressure(P,T);

  return(P);
}
There are several features that the FlySky system has that haven’t been covered here. In addition, the community of developers are likely to provide more features that aren’t available at the time of this writing. It would be worthwhile to check back on occasion to see where this goes.