Domed ESP32-Cam
This post will demonstrate how to build an outdoor domed camera using the ESP32-Cam module and various inexpensive parts. One of the limitations of the OV2640 camera module included with the ESP32-Cam is its low quality, especially in low light conditions. Attempts at adjusting the light sensitivity levels in software can only go so far, see the earlier post https://www.cloudacm.com/?p=3986 regarding those attempts.
This post will focus more on hardware modifications to improve the image quality and for its use in an outdoor setting. This video was the inspiration of the work demonstrated in this post.
Here are the parts list of items and their costs.
- 6 count of ESP32 Cam Modules with OV2640 camera sensors and USB to serial connector: $40
- 6 count dummy security cameras: $22
- 5 count IR cut lens filter M12 mount: $12
- 1 count 1.8mm 180 degree M12 CCTV lens: $12
- 3 count Matek Micro BEC 6-30V to 5V step down regulator: $15
- Total cost for a single camera is just shy of $30
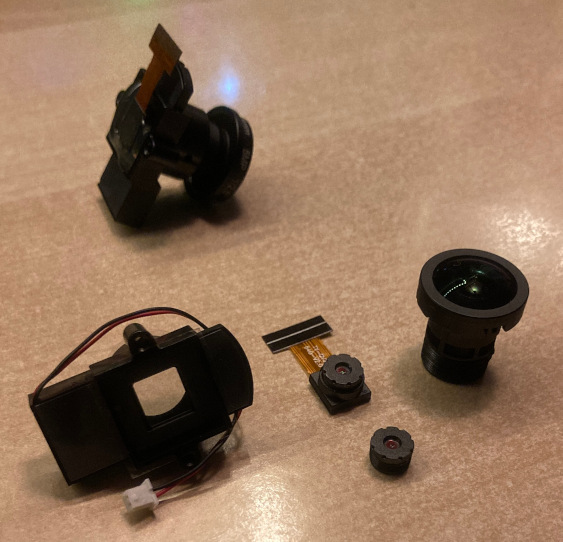
The first step is to remove the stock lens from the OV2640 camera sensor. Using forceps and some firm movement, the lens will rotate off the sensor housing without the need to cut at the cement. The M12 mount has an IR cut lens filter with a sliding window that can be set to either IR filter or no IR filter, it was set to no IR filter. Next, the M12 mount and sensor housing are joined together with hot glue. The control wires can be removed from the M12 mount, these aren’t used in this project. Next, the CCTV M12 lens is screwed on the M12 mount.
The modified camera sensor is then ready to be attached to the ESP32-Cam module. Once the data cable is attached, hot glue was used to fasten the housing to the module. With the included USB to serial mounting board, the ESP32-Cam can be started and the focus can be adjusted from the live stream. The lens threading then can be hot glued to prevent any movement, causing the camera to go out of focus.
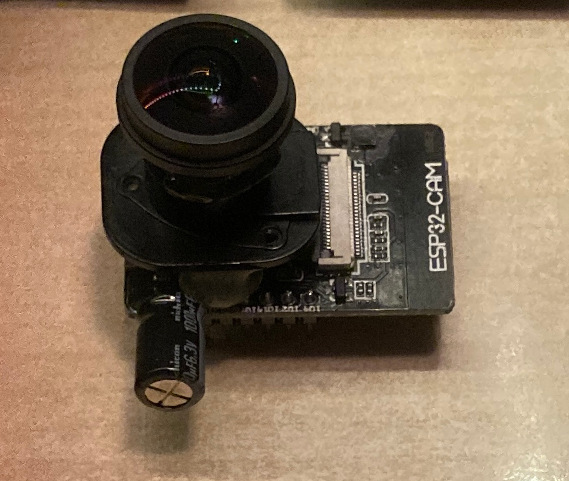
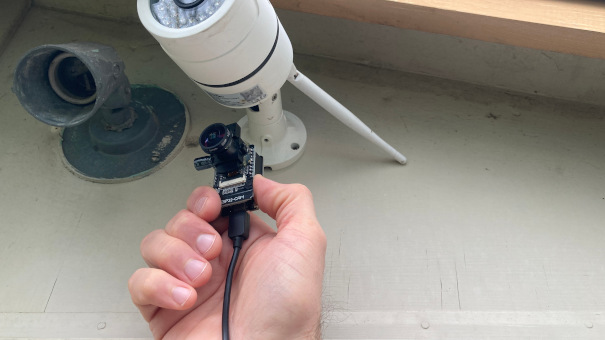
Now the camera can be field tested to determine the angle and tilt.
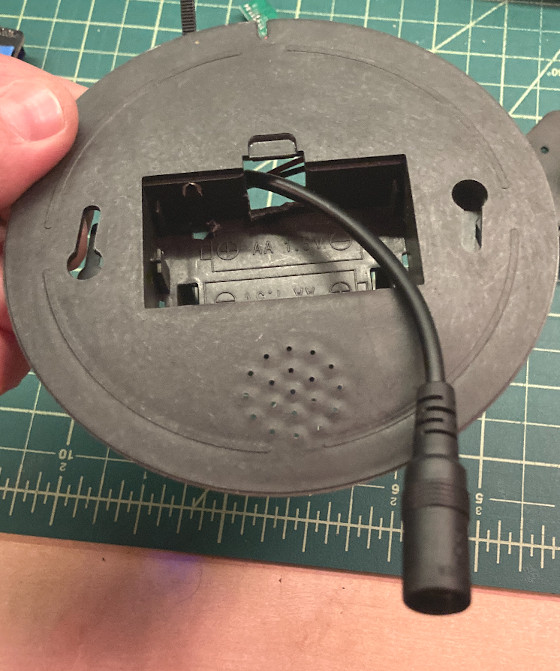
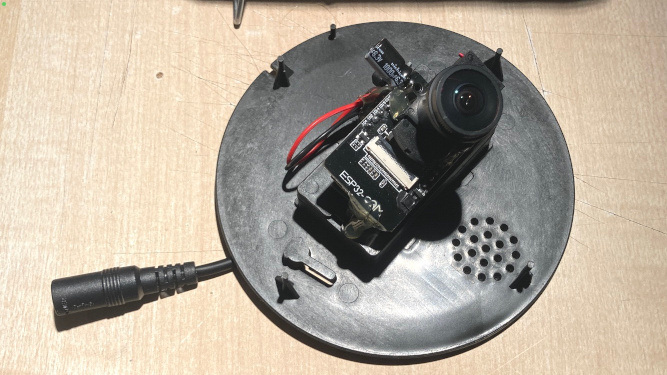
With the old camera removed, the 12V connector can be repurposed. This will be soldered to the input voltage and ground pads of the Mateksys voltage regulator. In addition to this the output 5 volt and ground leads are soldered to the regulator pads. This is then mounted inside the back plate of the dummy camera enclosure.

The 12V connector is fed through the back battery compartment.
Now the ESP32-Cam module can be attached to the 5V and ground. Based on the needed tilt and angle, shims can be used with hot glue to mount the camera to the back plate.
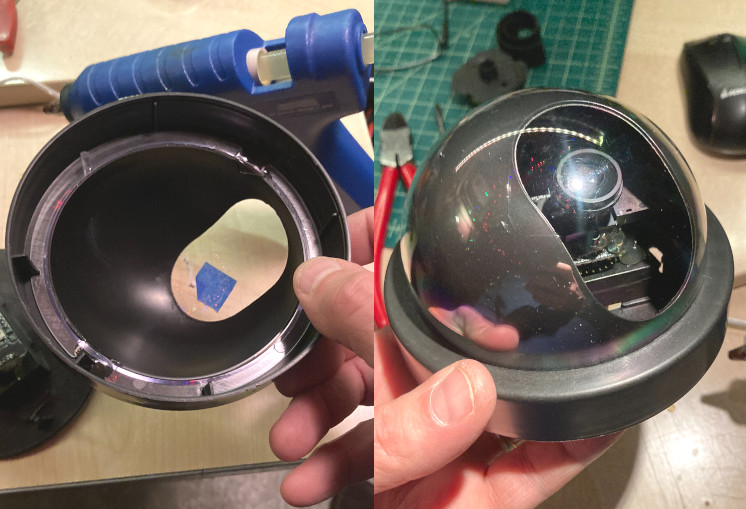
The dummy camera has a clear dome and covered dome included with it. Some painters tape was used to locate where the ESP32 lens center point is so that the dome covering could be adjusted. Once aligned, the dome covering was hot glued to the clear dome. The back plate is then ready to be reattached to the dome covering.
Using a template of the back plate mounting holes, screws were placed and the camera was attached to the existing power supply then mounted.

Now the camera is ready for use.

Here is the code used for this camera.
// Declarations and Variables

#include "src/OV2640.h"
#include <WiFi.h>
#include <WebServer.h>
#include <WiFiClient.h>
#include <PubSubClient.h>


#define ENABLE_WEBSERVER

#define CAMERA_MODEL_AI_THINKER

#include "camera_pins.h"

OV2640 cam;

const char* mqtt_server = "mqtt_broker_here";     // Put your MQTT Broker here
const char* ssid =     "ssid_here";               // Put your SSID here
const char* password = "wifi_password_here";           // Put your PASSWORD here

WiFiClient espClient;
PubSubClient client(espClient);
long lastMsg = 0;
char msg[50];
int value = 0;
int up = 1;

// Web Server Function

#ifdef ENABLE_WEBSERVER

WebServer server(80);

void handle_jpg_stream(void)
{
    WiFiClient client = server.client();
    String response = "HTTP/1.1 200 OK\r\n";
    response += "Content-Type: multipart/x-mixed-replace; boundary=frame\r\n\r\n";
    server.sendContent(response);

    while (1)
    {
        cam.run();
        if (!client.connected())
            break;
        response = "--frame\r\n";
        response += "Content-Type: image/jpeg\r\n\r\n";
        server.sendContent(response);

        client.write((char *)cam.getfb(), cam.getSize());
        server.sendContent("\r\n");
        if (!client.connected())
            break;
    }
}

void handle_jpg(void)
{
    WiFiClient client = server.client();

    cam.run();
    if (!client.connected())
    {
        return;
    }
    String response = "HTTP/1.1 200 OK\r\n";
    response += "Content-disposition: inline; filename=capture.jpg\r\n";
    response += "Content-type: image/jpeg\r\n\r\n";
    server.sendContent(response);
    client.write((char *)cam.getfb(), cam.getSize());
}

void handleNotFound()
{
    String message = "Server is running!\n\n";
    message += "URI: ";
    message += server.uri();
    message += "\nMethod: ";
    message += (server.method() == HTTP_GET) ? "GET" : "POST";
    message += "\nArguments: ";
    message += server.args();
    message += "\n";
    server.send(200, "text/plain", message);
}
#endif


// MQTT Functions

void callback(char* topic, byte* message, unsigned int length) {
  String messageTemp;

  for (int i = 0; i < length; i++) {
    messageTemp += (char)message[i];
  }

/***
  // Feel free to add more if statements to control more GPIOs with MQTT

  // If a message is received on the topic esp32/output, you check if the message is either "on" or "off".
  // Changes the output state according to the message
  if (String(topic) == "Domed_ESP32-Cam/Manual") {
    if(messageTemp == "On"){
      Manual_State = HIGH; // The ESP32-Cam Built in LED is a inversed, LOW = On and HIGH = Off
    }
    else if(messageTemp == "Off"){
      Manual_State = LOW; // The ESP32-Cam Built in LED is a inversed, LOW = On and HIGH = Off
    }
  }
  else if (String(topic) == "Domed_ESP32-Cam/Override") {
    if(messageTemp == "On"){
      Override_State = HIGH; // The ESP32-Cam Built in LED is a inversed, LOW = On and HIGH = Off
    }
    else if(messageTemp == "Off"){
      Override_State = LOW; // The ESP32-Cam Built in LED is a inversed, LOW = On and HIGH = Off
    }
  }
***/


}

void reconnect() {
  // Loop until we're reconnected
  while (!client.connected()) {
    // Attempt to connect
    if (client.connect("Domed_ESP32-Cam")) {
      // Subscribe
      // Do you not subscribe to my methods?
      // # for everything, or Domed_ESP32-Cam/LED for just the LED
      client.subscribe("Domed_ESP32-Cam/#");
    } else {
      // Wait 5 seconds before retrying
      delay(5000);
    }
  }
}


// Setup Function

void setup()
{

    client.setServer(mqtt_server, 1883);
    client.setCallback(callback);

    camera_config_t config;
    config.ledc_channel = LEDC_CHANNEL_0;
    config.ledc_timer = LEDC_TIMER_0;
    config.pin_d0 = Y2_GPIO_NUM;
    config.pin_d1 = Y3_GPIO_NUM;
    config.pin_d2 = Y4_GPIO_NUM;
    config.pin_d3 = Y5_GPIO_NUM;
    config.pin_d4 = Y6_GPIO_NUM;
    config.pin_d5 = Y7_GPIO_NUM;
    config.pin_d6 = Y8_GPIO_NUM;
    config.pin_d7 = Y9_GPIO_NUM;
    config.pin_xclk = XCLK_GPIO_NUM;
    config.pin_pclk = PCLK_GPIO_NUM;
    config.pin_vsync = VSYNC_GPIO_NUM;
    config.pin_href = HREF_GPIO_NUM;
    config.pin_sscb_sda = SIOD_GPIO_NUM;
    config.pin_sscb_scl = SIOC_GPIO_NUM;
    config.pin_pwdn = PWDN_GPIO_NUM;
    config.pin_reset = RESET_GPIO_NUM;
    config.xclk_freq_hz = 20000000;
    config.pixel_format = PIXFORMAT_JPEG;
    config.frame_size = FRAMESIZE_SVGA;
    config.jpeg_quality = 10;
    config.fb_count = 1;

    cam.init(config);

   sensor_t * s = esp_camera_sensor_get();

   s->set_vflip(s, 1);          // 0 = disable , 1 = enable
   s->set_hmirror(s, 1);        // 0 = disable , 1 = enable

/* see https://randomnerdtutorials.com/esp32-cam-ov2640-camera-settings/

sensor_t * s = esp_camera_sensor_get();

s->set_brightness(s, 0);     // -2 to 2
s->set_contrast(s, 0);       // -2 to 2
s->set_saturation(s, 0);     // -2 to 2
s->set_special_effect(s, 0); // 0 to 6 (0 - No Effect, 1 - Negative, 2 - Grayscale, 3 - Red Tint, 4 - Green Tint, 5 - Blue Tint, 6 - Sepia)
s->set_whitebal(s, 1);       // 0 = disable , 1 = enable
s->set_awb_gain(s, 1);       // 0 = disable , 1 = enable
s->set_wb_mode(s, 0);        // 0 to 4 - if awb_gain enabled (0 - Auto, 1 - Sunny, 2 - Cloudy, 3 - Office, 4 - Home)
s->set_exposure_ctrl(s, 1);  // 0 = disable , 1 = enable
s->set_aec2(s, 0);           // 0 = disable , 1 = enable
s->set_ae_level(s, 0);       // -2 to 2
s->set_aec_value(s, 300);    // 0 to 1200
s->set_gain_ctrl(s, 1);      // 0 = disable , 1 = enable
s->set_agc_gain(s, 0);       // 0 to 30
s->set_gainceiling(s, (gainceiling_t)0);  // 0 to 6
s->set_bpc(s, 0);            // 0 = disable , 1 = enable
s->set_wpc(s, 1);            // 0 = disable , 1 = enable
s->set_raw_gma(s, 1);        // 0 = disable , 1 = enable
s->set_lenc(s, 1);           // 0 = disable , 1 = enable
s->set_hmirror(s, 0);        // 0 = disable , 1 = enable
s->set_vflip(s, 0);          // 0 = disable , 1 = enable
s->set_dcw(s, 1);            // 0 = disable , 1 = enable
s->set_colorbar(s, 0);       // 0 = disable , 1 = enable

The frame size can be set to one of these options:

FRAMESIZE_UXGA (1600 x 1200)
FRAMESIZE_QVGA (320 x 240)
FRAMESIZE_CIF (352 x 288)
FRAMESIZE_VGA (640 x 480)
FRAMESIZE_SVGA (800 x 600)
FRAMESIZE_XGA (1024 x 768)
FRAMESIZE_SXGA (1280 x 1024)

*/
    IPAddress ip;

    WiFi.mode(WIFI_STA);
    WiFi.begin(ssid, password);
    while (WiFi.status() != WL_CONNECTED)
    {
        delay(500);
    }
    ip = WiFi.localIP();

#ifdef ENABLE_WEBSERVER
    server.on("/", HTTP_GET, handle_jpg_stream);
    server.on("/jpg", HTTP_GET, handle_jpg);
    server.onNotFound(handleNotFound);
    server.begin();
#endif

}
/***
CStreamer *streamer;
CRtspSession *session;
***/


// Main Loop Function

void loop()
{

  if (!client.connected()) {
    reconnect();
  }
  client.loop();


  long now = millis();
  if (now - lastMsg > 5000) {
    lastMsg = now;

    client.publish("Domed_ESP32-Cam/Firmware", "Domed_ESP32-Cam_ver2");
    String StringUptime = String(millis());
    client.publish("Domed_ESP32-Cam/Uptime", StringUptime.c_str());
    String StringHWAddress = String(WiFi.macAddress());
    client.publish("Domed_ESP32-Cam/HWAddress", StringHWAddress.c_str());
    String StringWifiSignal = String(WiFi.RSSI());
    client.publish("Domed_ESP32-Cam/WifiSignal",StringWifiSignal.c_str());


  }

  server.handleClient();

}
It nice to see an even less expensive alternative to unmodified factory firmware cameras.